

If your laptop has a NVIDIA based hybrid graphics card and you use Linux, you might have had the “pleasure” of learning about the woeful state of support, especially compared to AMD cards. But worst of all, the biggest problem many encounter is that external displays don’t work after installing Nvidia drivers on laptops with hybrid “Optimus” based graphics!
I have a MSI GS-65 gaming laptop with a GTX 1070 graphics card, and this is the first of many issues I ran into after installing Linux to this machine for the first time. I found that I could either choose to have the computer display to the external monitor, or choose to display to the laptop’s screen. There was no way to do both at the same time, wtf!?!
The reason for this is because the laptop screen is being powered by a lower-powered intel graphics card, and the external display is being powered through the higher powered NVIDIA card. In Windows, the driver intelligently handles switching between the NVIDIA card for more power hungry tasks and the lower powered Intel card to save power.
Unfortunately, the state of affairs in Linux is far worse. The hybrid mode switching for these type of graphics card is nowhere near as good as on Windows. There are a few options, but each of them has drawbacks:
- Open source
nouveaudrivers work, but performance is an order of magnitude slower than proprietary Nvidia drivers Bumblebeewas previous solution for hybrid graphics switching, but the drivers are old and external display support is very subpar- Proprietary “prime” drivers are fast, but have issues with external displays and don’t work at all with Wayland.
And, the main issue with external displays still remained: the propritery NVIDIA drivers could not output from the NVIDIA graphics card to another graphics device (which is required to display to both the Laptop screen and external display at the same time)…that is, until recently!
Version 1.4 of the X Resize, Rotate, and Reflect Extension (RandR 1.4 for short) adds a way for drivers to work together so that one graphics device can display images rendered by another. This can be used on Optimus-based laptops to display a desktop rendered by an NVIDIA GPU on a screen connected to another graphics device, such as an Intel integrated graphics device or a USB-to-VGA adapter.
In English, this essentially means that the more powerful NVIDIA card can render all of the graphics, and then output to the laptop’s display (as well as an external monitor simultaneously). This technique is called Offloading Graphics Display, and once set up can be toggled on or off with a simple command to save battery power.
Using this technique provides the fast performance of the NVIDIA drivers while displaying flawlessly on external monitors. It works great on my 144hz displays! The only downside that I can see is lack of Wayland support, but I’m willing to live with that.
Let’s get started with the install steps below!
Install Steps
🔥 Before performing any of the steps here, make sure you have everything backed up. These steps worked for me, but I take no responsibility if you hose your system!!!
(That being said, I do have a little troubleshooting guide at the end in case you do run into an issue booting back into X windows. When I did this myself, I accidentally forgot to paste in the
Bus IDbefore I rebooted and it gave me a black screen, so knowing how to solve these type of issues can save a lot of headache)
-
Install
video-hybrid-intel-nvidia-440xx-primethe latest driver, and reboot after completed.-
Since I use Manjaro, I used the
mhwdHardware Configuration tool: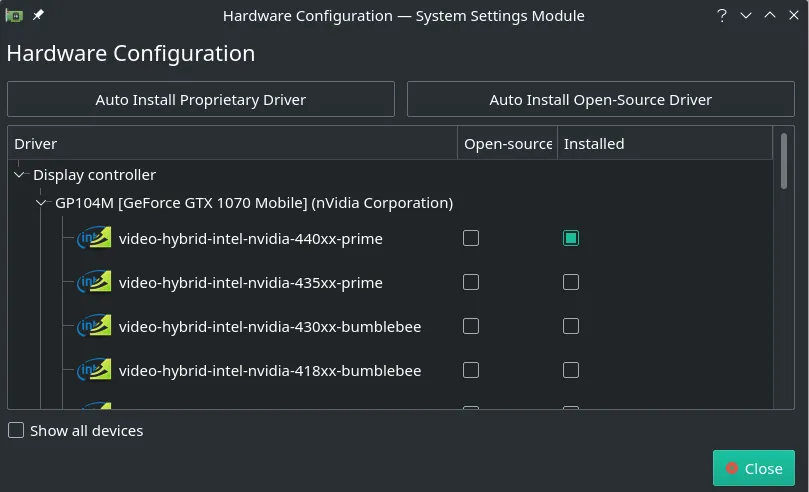
-
-
Paste the following code into
/etc/X11/xorg.conf, and leave the file open. We’re going to be replacing theBusID.Section "ServerLayout" Identifier "layout" Screen 0 "nvidia" Inactive "intel" EndSection Section "Device" Identifier "nvidia" Driver "nvidia" **BusID "<BusID for NVIDIA device here>"** EndSection Section "Screen" Identifier "nvidia" Device "nvidia" Option "AllowEmptyInitialConfiguration" EndSection Section "Device" Identifier "intel" Driver "modesetting" EndSection Section "Screen" Identifier "intel" Device "intel" EndSection -
Open
NVIDIA X Server Settingsapplication, select your graphics card (mine isGPU 0, for example), and copy theBus IDto your clipboard: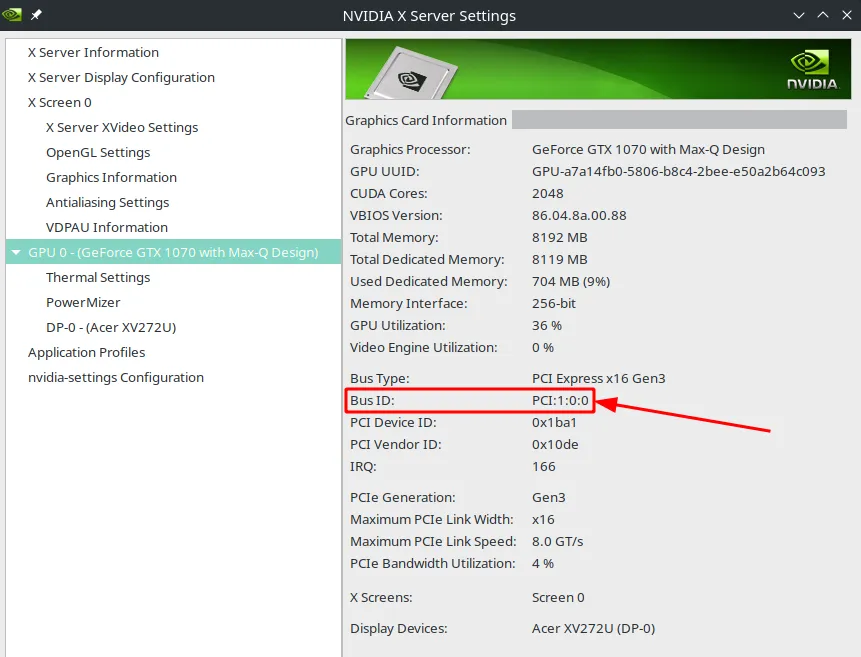
-
Paste the
Bus IDinto thexorg.conffile you still should have open. The modified section will look something like this when completed.
Section "Device"
    Identifier "nvidia"
    Driver "nvidia"
    **BusID "PCI:1:0:0"**
EndSection
- Reboot your computer, and everything should now be working!
To Toggle Prime Synchronication
If synchronization is being used but is not desired, it can be disabled with:
$ xrandr --output <output> --set "PRIME Synchronization" 0
and re-enabled with:
$ xrandr --output <output> --set "PRIME Synchronization" 1
Troubleshooting
If you have any trouble booting up…
- Hit
Ctrl-Alt-F2to log into a manual terminal session, as root - Revert the contents of your
/etc/X11/xorg.conffile, and reboot - Viola! You’re back to where you started =)